Day 294/365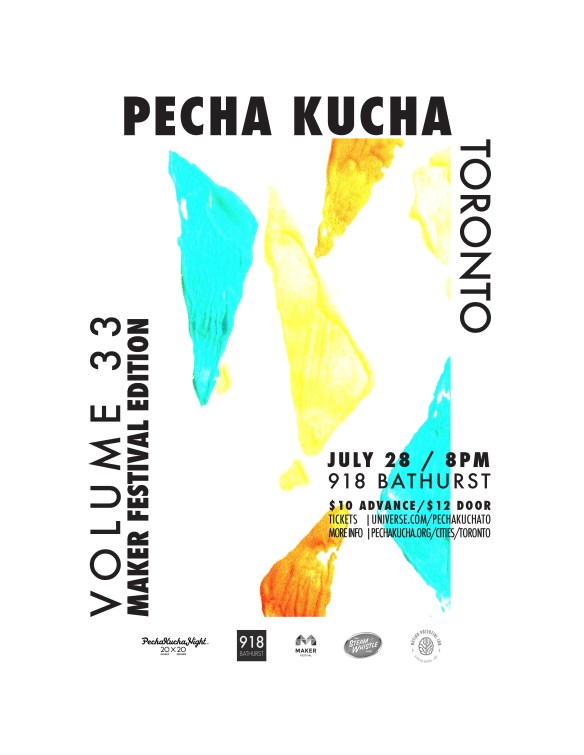 I’ll be at this amazing event tonight, selling my wares. It should be a fantastic night of story presentations, drinks and learning!
To purchase tickets online, go here.

Day 294/365I’ll be at this amazing event tonight, selling my wares. It should be a fantastic night of story presentations, drinks and learning!
To purchase tickets online, go here.
Day 293/365
Today I’m going to talk about using your watercolour journal out in the field! It’s fun, I promise!!
 I recently took a few days off to enjoy some time in the woods, near a lake and I decided it would be fun to do some sketching. So, today I’m going to talk about my tricks and tips for watercolour sketching when camping/cottaging/hiking.
Disclaimer: I am not even going to try and pretend that I’m any sort of expert at watercolour painting. This post isn’t about how to paint with watercolours, but rather, how to enjoy watercolour painting (and maybe even just sketching), in a handbound sketchbook while out in woods.
 6 Tips for Watercolour Sketching In the Field:
6. Choose appropriate paints. For example, I use watercolour pencils, because they aren’t messy, are easy to transport and easy to use. Also, I like to use a refillable watercolour brush, the type where you fill the handle with water. I take a couple of them, pre-filled and I’m set for a day of sketching and painting! If you prefer pans/cakes of watercolour paint, consider getting one of those nifty little travel boxes with foldout trays, and put it in it’s own zip-top bag (no leaky paints!!).
5. Bug repellant. Pretty much assume that there will be bugs that want to bite. Mosquitos, black flies, etc. There are lots of repellants to choose from, do some research on what type of bugs will be at your destination, what types of repellant work best (and are most friendly to the environment and your health) and go from there. Trust me, it’ll be a much more enjoyable experience.
4. Waterproof everything, especially if canoeing is involved or rain is probable. This is simple though, no fancy equipment needed. Just put your sketchbook and paints (especially if you use pans/cakes of paint) in a tough, thick, freezer zip-top plastic bag. Also, if you keep this bag in an outside pocket of your backpack, then it’s really handy for quick-sketching! (Note that my ‘waterproof freezer bag’ makes an appearance in the photo above, it’s underneath the book as it had just rained and the moss on that rock was not quite dry)
 3. Don’t be afraid to take your nice sketchbook. I took a full fabric watercolour journal (pictured above, and found online here) and am so glad I did. Not only was it tough enough to handle a few days of camping, but it looks really good on the coffee table after the trip. As long as you follow the previous tips and take the steps needed to protect against things that can damage any sketchbook (fancy or plain), then you should be fine.
2. Slow down, open your eyes, and look around. There are fascinating things everywhere in the woods, all sketch-worthy. For example, hiking one day I passed by a large rock with circular patterns on it and thought it was neat, but carried on. Someone else wanted to take a photo of a rare flower, so we stopped and I thought of the rock again. Going back and inspecting it more closely revealed it was some sort of moss or lichen, with teeny tiny trumpet-like flowers in ash grey. It looked like a beautiful underwater landscape!
1.Take your sketchbook with you everywhere on your camping/hiking trip. You never know when someone else might need to take a rest, or find a patch of wild raspberries and want to stop and pick some, giving you a chance to sketch the local flora and fauna; flowers, stone formations, rivers, lakes, trees, little forest critters, etc.
*Important: if you’re out in bear country just know that berries are bear food. Keep your eyes peeled and leave some for others (human and animal). And of course, know the rules and laws for the land you are hiking/camping, the poisonous plants of the area, local warnings, etc. I’m just sharing this info because I’m a girl guide forever: Be Prepared!!!
 And that’s it, those are my tips! I’d love to hear any other tips or exciting art-hiking-camping stories you might have, leave them in the comments below!
*To read more ‘Use Your Journal’ posts, go here for the latest list.
Day 292/365
Join me on Saturday August 8 at the Blossom & Bloom Show in Unionville!
It’s a well-curated selection of makers, floral designers, artists and vintage sellers. Come out for the day and explore picturesque Unionville!
When: Saturday August 8, 11am – 4pm
Where: Varley Art Gallery Courtyard, 216 Main Street, Unionville
For more information, please see the show website here.
Day 291/365

Today I was at Graven Feather teaching the new Arrow Stitch Hardcover journal Workshop!
If you didn’t make it out this time, check the Workshops tab at the top for upcoming dates.
Day 290/365
I’m pleased to announce that I’ll be at Pecha Kucha on July 28, selling my wares as a maker! Since this evening event is a part of the Maker Festival, it’s sure to be extra special and fun!
Don’t know what Pecha Kucha is? No problem, go here to read all about it.
This edition will be a gathering of a diverse range of makers, each sharing their stories and thoughts on the realities of making. (I know, sounds so good!)
What: Pecha Kucha Night Toronto
When: July 28, 8pm – 11pm
Where: 918 Bathurst Street, Toronto (just north of Bathurst subway station
Cost: $10 in advance, $12 at the door
To get tickets and register ahead of time, go here.
Day 289/365
To wear books as jewellery give me great joy, who’s with me?! Today I’m talking about the book jewellery I make, some of it’s functional and some of it’s purely aesthetic. Either way, they’re all pretty awesome!
Paper Moon Book Earrings As most makers know, when you create things by hand, you usually end up with off-cuts and bits and pieces that are in perfect condition, but just a bit too small for your main projects. That’s how these earrings started. I love making them because it means using up the whole sheet of fancy-pants paper, and crafting items that bring joy to others.
They’re perfect for sunny summer days! Perhaps reading at a cafe, lounging at the beach or spending the day hunting for the perfect collection of used books. I love that the front is decorative, fancy paper, and the backs are from novels, with a peek-a-boo hole for a pop of colour.

Mini Book Necklace As a kid I was really into pendant necklaces that were functional; little harmonicas, little pouches, tiny sundials, and I’m pretty sure I had at least one book necklace (cotton candy pink!!). So designing a Sprouts Press mini book necklace was an obvious decision.
While these gorgeous leather necklaces aren’t the bright pink versions from my childhood, they are not only beautiful, but functional too! They open, you can write in them, and keep your ideas and dreams close to your heart. They even showcase fancy endpapers in the front and back. Made from reclaimed leather left over from larger leather projects, the colours usually change seasonally, so keep your eyes peeled and when you see one you like – grab it!
Did you know that I have a whole section of my etsy shop dedicated to Book Jewellery? Check it out here.
Day 288/365
Day 287/365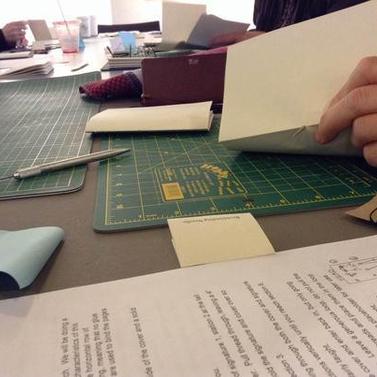
The next bookbinding workshop is coming up – this saturday, July 25! I’ll be teaching the new class: Hard Cover Arrow Stitch over at Graven Feather on Queen St. West here in Toronto. 
In this workshop we’ll be making the binding shown above, as a hardcover book and there will be a couple of colour choices for participants.
Also, a few of you have been asking about the size of the book we’ll be making. The finished project will measure 14.5cm x 10cm and be around 2cm thick at the spine. It’s a great book to use as an art journal because of it’s handy size. But also because the spine has room to allow for paper ephemera to be added. Fun!!
For more details and to learn how to register, go here.
Day 286/365
Today I’m reflecting on one of my favourite projects to date; the painted journeys journal! These journals are a combination of painting, printmaking and bookbinding. I’ve written about the joys of creating in multiples and mixing mediums before on this post, but I haven’t talked about all three series together.
It all started with the set of pink journals in the bottom left corner, these were my first foray into this series. It was a lovely afternoon of painting, printing and then bookbinding. After they all found new homes (excepting the one I saved for myself as a photo prop) I wanted more! Then the blue series happened! This time, I made a different shape and size, and used the off cuts to make cute little mini books, which is all I have left of this series. Lastly, the most recent are the Journeys Journals in brown. Inspired by a not-so-Canadian winter that left my snow boots more muddy than icy. I plan to write a more detailed account of these books, so stay tuned for that. In the meantime, you can take a look at the Journeys Journal in the Artist’s Books section of my Etsy shop, there are a couple left.
I’ve enjoyed working on these books as they develop in slightly different directions with each series. I switched up the binding for the blue series, but went back to the Japanese Stab Binding for the Journeys Journals. I really appreciate the construction of the matchbook cover and the geometric shapes created by the stitching.
Day 285/365
The last couple of weeks have been the start of holiday production time here at Sprouts Press. I talked about this a little while ago in this post. Today I’m making ornaments, thinking about the last time I made ornaments, which wasn’t for Christmas at all!

This is an ‘in progress’ shot of my Valentines Starburst Book Ornaments being made, with pages from Shakespeare’s Romeo and Juliet. I really enjoy pairing up appropriate literature to the holiday to make these decorations. Last year I used Dicken’s A Christmas Carol, which I plan to use again, but I’ll have an additional choice this year – stay tuned!
